
Overview
Hello game developers, thank you for taking interest in my Unity ECS 1.0 Full Project Tutorial!
I initially created this tutorial back in October 2022, shortly after the first experimental release of Unity ECS 1.0. Since then, there have been a few minor changes on the specifics about how things are implemented in the API. However, the main concepts of Data-Oriented Design remain the same.
In the following post, I will be providing what needs to be changed in the original project, so that it is fully compatible with the latest version of the Unity Entities package which is 1.0.14 at the time of writing.
Although this may seem like quite a lengthy post, most of the changes are quite minor and isn’t too far off from what is taught in the video. I’ve also included some additional context as to what these changes mean for those who are curious.
Also, one major issue with my original tutorial is that you couldn’t actually create a build from it! There were a few things causing this issue which I wasn’t aware of at the time, and we’ll be resolving those issues in this post so you can create a build of this application and run it for maximum performance.
For reference here is the original tutorial video:
Table of Contents
- Upgrade Project & Packages
- Remove Old Transform API
- Change GetAspectRW to GetAspect
- Change [EntityInQueryIndex] to [ChunkIndexInQuery]
- Add RequireForUpdate to Some Systems
- Fix Obsolete API in Bakers
- Change ZombieSpawnPoints from NativeArray to BlobAsset
- Creating a Build & Troubleshooting
- Conclusion
Full scripts of the changed files will be linked to throughout the article, but you can access them all here
Upgrade Project & Packages
- Unity Editor Version: 2022.3.4f1 – The Unity documentation recommends using 2022.3.0f1 or newer for this version the Entities package.
- Any Unity Editor Version 2022.3.X (22 LTS) should all be compatible but I recommend using at least version 2022.3.4f1 as there were some stability issues with the earlier versions.
- Entities Version: 1.0.14 – If you are on an older version of the Entities package, you can upgrade the Entities Graphics package to the latest version via the package manager.
- Depending on your Unity version, you may not be able to directly upgrade the package, but just click the + icon and do “add package by name” and type in com.unity.entities.graphics and it should upgrade all necessary packages to the latest version.
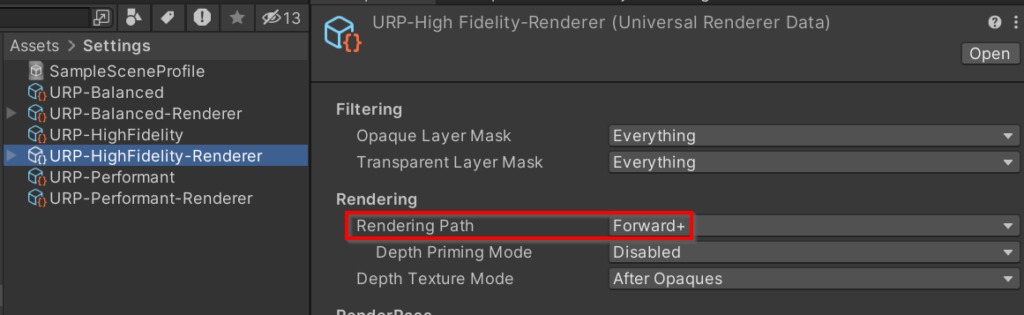
- Change rendering path to Forward+
- Locate the SRP Asset your project is using – Open Project Settings window, in the graphics section, select the asset listed in the Scriptable Render Pipeline Settings field
- In the inspector window for that asset, click on the associated asset in the Renderer List, and select THAT asset to be shown in the inspector (mine is the URP-HighFidelity-Renderer)
- Change Rendering Path to Forward+
Remove Old Transform API
In the Entities updates since this video was posted some of the Transfrom API has been removed and changed. These changes end up simplifying things a bit more, though there are many changes we need to make as the video heavily used the previous API.
Conceptually, there is no difference to what we are doing, just accessing Position, Rotation, and Scale for different entities. But the way we do that is changed.
Remove TransformAspect and UniformScaleTransform from Custom Aspects
Many of the custom aspects we created in the tutorial video have a reference to the TransformAspect and UniformScaleTransform, which have now been removed. Unity has done some cleanup on the Transform API to make it very easy to just modify the Transform components directly, eliminating the need for a TransformAspect and UniformScaleTransform.
These are the files that will need to be updated – click the hyperlink on them to see the full file in context after modification.
Summary of changes:
Instead of referencing the TransformAspect as we did like this:
private readonly TransformAspect _transform;Reference the LocalTransform component directly like this:
private readonly RefRW<LocalTransform> _transform;Be sure to make that change in all 5 of the listed aspect files!
Previously, in BrainAspect, we modified the scale on the LocalToWorld like this:
public void DamageBrain()
{
    // Irrelevant code hidden //

    var ltw = _transform.LocalToWorld;
    ltw.Scale = _brainHealth.ValueRO.Value / _brainHealth.ValueRO.Max;
    _transform.LocalToWorld = ltw;
}
But now, we can just modify the Scale on the LocalTransform component directly:
public void DamageBrain()
{
    // Irrelevant code hidden //

    _transform.ValueRW.Scale = _brainHealth.ValueRO.Value / _brainHealth.ValueRO.Max;
}
Remember, when writing to a component in an aspect, we need to access it by using .ValueRW
In the Eat(…) method of ZombieEatAspect, we’ll write to the Rotation like this:
public void Eat(float deltaTime, EntityCommandBuffer.ParallelWriter ecb, int sortKey, Entity brainEntity)
{
    // Irrelevant code hidden //

    _transform.ValueRW.Rotation = quaternion.Euler(eatAngle, Heading, 0);

    // Irrelevant code hidden //
}
And in IsInEatingRange(…) we’ll just need to read the Position using _transform.ValueRO
public bool IsInEatingRange(float3 brainPosition, float brainRadiusSq)
{
    return math.distancesq(brainPosition, _transform.ValueRO.Position) <= brainRadiusSq - 1;
}
Walk(…) and IsInStoppingRange(…) of ZombieWalkAspect have a few reads/writes that need to be fixed:
public void Walk(float deltaTime)
{
    WalkTimer += deltaTime;
    _transform.ValueRW.Position += _transform.ValueRO.Forward() * WalkSpeed * deltaTime;

    var swayAngle = WalkAmplitude * math.sin(WalkFrequency * WalkTimer);
    _transform.ValueRW.Rotation = quaternion.Euler(0, Heading, swayAngle);
}

public bool IsInStoppingRange(float3 brainPosition, float brainRadiusSq)
{
    return math.distancesq(brainPosition, _transform.ValueRO.Position) <= brainRadiusSq;
}
Similar for ZombieRiseAspect:
public void Rise(float deltaTime)
{
    _transform.ValueRW.Position += math.up() * _zombieRiseRate.ValueRO.Value * deltaTime;
}

public bool IsAboveGround => _transform.ValueRO.Position.y >= 0f;

public void SetAtGroundLevel()
{
    var position = _transform.ValueRO.Position;
    position.y = 0f;
    _transform.ValueRW.Position = position;
}
GraveyardAspect is a bit different because we only need to read values from the LocalTransform, never write to it. So we can do a little optimization by using RefRO<LocalTransform>. I’ve also added a transform property to read the values a bit cleaner.
private readonly RefRO<LocalTransform> _transform;
private LocalTransform Transform => _transform.ValueRO;
Anywhere we previously had _transformAspect.Postion, just replace that with Transform.Position
private float3 GetRandomPosition()
{
    float3 randomPosition;
    do
    {
        randomPosition = _graveyardRandom.ValueRW.Value.NextFloat3(MinCorner, MaxCorner);
    } while (math.distancesq(Transform.Position, randomPosition) <= BRAIN_SAFETY_RADIUS_SQ);

    return randomPosition;
}

private float3 MinCorner => Transform.Position - HalfDimensions;
private float3 MaxCorner => Transform.Position + HalfDimensions;
public float3 Position => Transform.Position;
Also in GraveyardAspect, we’ll need to change two methods that previously returned UniformScaleTransform to now return LocalTransform. Also note the updated reference to Transform.Position in the second method!
public LocalTransform GetRandomTombstoneTransform()
{
    return new LocalTransform
    {
        Position = GetRandomPosition(),
        Rotation = GetRandomRotation(),
        Scale = GetRandomScale(0.5f)
    };
}

public LocalTransform GetZombieSpawnPoint()
{
    var position = GetRandomZombieSpawnPoint();
    return new LocalTransform
    {
        Position = position,
        Rotation = quaternion.RotateY(MathHelpers.GetHeading(position, Transform.Position)),
        Scale = 1f
    };
}
That’s all for GraveyardAspect for now, but we’ll return to it later as we need to resolve one other issue to support builds.
Change LocalToWorldTransform to LocalTransform in Systems
Now that our aspects have changed, we need to update our systems to work with the new data types. These are the files that need to be modified, again clicking the hyperlink brings you to the full file with modified code:
- CameraControllerSystem.cs
- SpawnTombstoneSystem.cs
- SpawnZombieSystem.cs
- ZombieEatSystem.cs
- ZombieWalkSystem.cs
CameraControllerSystem, ZombieEatSystem, and ZombieWalkSystem need to reference the current scale of the brain. Previously this was done like this:
var brainScale = SystemAPI.GetComponent<LocalToWorldTransform>(brainEntity).Value.Scale;Now this can be changed to the following code. Note that we get LocalTransform rather than LocalToWorldTransform and we no longer need that additional .Value as Scale is a member of the LocalTransform component.
var brainScale = SystemAPI.GetComponent<LocalTransform>(brainEntity).Scale;Much better!
For the SpawnTombstoneSystem, setting the initial tombstone position was done like this:
var newTombstoneTransform = graveyard.GetRandomTombstoneTransform();
ecb.SetComponent(newTombstone, new LocalToWorldTransform { Value = newTombstoneTransform });
But now it can be done like this:
var newTombstoneTransform = graveyard.GetRandomTombstoneTransform();
ecb.SetComponent(newTombstone, newTombstoneTransform);
Easy peasy! We can do this because when we get the newTombstoneTransform from the previous line of code, we already updated the GraveyardAspect to return a LocalTransform type in the previous step.
And of course don’t forget to update the ZombieSpawnSystem similarly:
var newZombieTransform = graveyard.GetZombieSpawnPoint();
ECB.SetComponent(newZombie, newZombieTransform);
Change GetAspectRW to GetAspect
This is a small change introduced in the 1.0.8 version of entities. There are two systems where we utilized SystemAPI.GetAspectRW that need to be updated to SystemAPI.GetAspect.
The first is in the SpawnTombstoneSystem where we need to change this line:
var graveyard = SystemAPI.GetAspectRW<GraveyardAspect>(graveyardEntity);To this:
var graveyard = SystemAPI.GetAspect<GraveyardAspect>(graveyardEntity);Then in the InitializeTombstoneRendererSystem, change this:
var graveyard = SystemAPI.GetAspectRW<GraveyardAspect>(SystemAPI.GetSingletonEntity<GraveyardProperties>());To this:
var graveyard = SystemAPI.GetAspect<GraveyardAspect>(SystemAPI.GetSingletonEntity<GraveyardProperties>());Just a simple API change, here are the full files changed:
Change [EntityInQueryIndex] to [ChunkIndexInQuery]
Simple change, but there are two things going on here I’d like to explain. For one, [EntityInQueryIndex] is obsolete, in favor of [EntityIndexInQuery] (different name, but does the same thing). However, we can go a step further and use [ChunkIndexInQuery] instead.
This is a small efficiency gain because it still gives us the benefit of using a “sort key” for our parallel entity command buffers, but we don’t need to calculate the unique index of each entity as we don’t really care about the order of playback on a per entity basis.
[ChunkIndexInQuery] provides us a sort key that is unique per chunk, which means that it will be unique on a per thread basis, which is all that really matters for parallel Entity Command Buffers.
Make this change in the IJobEntity jobs of the following files:
Here is the previous code from ZombieEatSystem:
[BurstCompile]
public partial struct ZombieEatJob : IJobEntity
{
    // Job Params

    [BurstCompile]
    private void Execute(ZombieEatAspect zombie, [EntityInQueryIndex]int sortKey)
    {
        // Job Body
    }
}
You’ll see its just as easy as updating the attribute before the int sortKey:
[BurstCompile]
public partial struct ZombieEatJob : IJobEntity
{
    // Job Params

    [BurstCompile]
    private void Execute(ZombieEatAspect zombie, [ChunkIndexInQuery]int sortKey)
    {
        // Job Body
    }
}
Then just do that on the ZombieRiseJob and ZombieWalkJob as well and you’re all set!
Add RequireForUpdate to Some Systems
I should have caught this one during the initial tutorial, but it is best practice to include a RequireForUpdate<T> whenever you are getting a singleton component or entity. I did this a few times, but not EVERY time.
In the editor this ends up not being an issue if you have your subscene open, but if you close your subscene or try to run a build, you will get an error on the first frame as it cannot find the singleton. This is an issue because is causes the build to either freeze or crash.
Luckily, this is another simple change on the following files:
For these we just need to ensure the brain singleton exists and we can do that via the BrainTag. In the OnCreate() of those systems, just do this:
[BurstCompile]
public void OnCreate(ref SystemState state)
{
    state.RequireForUpdate<BrainTag>();
}
That’s literally it.
Fix Obsolete API in Bakers
As you’ll recall, Bakers essentially take a GameObject and convert them into entities at runtime. There are a number of built-in methods we can use to add components to the generated entity. In the tutorial we could just do something like this to add a tag to an entity:
AddComponent<BrainTag>();However, this is now obsolete in favor of way that gives us more control over the outputted entity. Now, we’ll need to get a reference to the outputted entity, but in doing so we’ll need to define the TransformUsageFlags for that entity.
The TransformUsageFlags are something I’d like to cover a bit more in depth at some point, but essentially they allow us to define which transform components are required on a given entity. For example, setting the TransformUsageFlags to Dynamic, give the resulting entity all the default transform components. Setting it to Renderable, means that it will only have the components necessary for rendering the entity, but not the ones for moving it in the world.
All that to say, we’ll need to update our Bakers in this project. We’re not doing anything too crazy, so we can just use the Dynamic TransformUsageFlags for all these cases. Here are the files we’ll be changing:
Previously for the BrainBaker, we had this:
public class BrainBaker : Baker<BrainMono>
{
    public override void Bake(BrainMono authoring)
    {
        AddComponent<BrainTag>();
        AddComponent(new BrainHealth { Value = authoring.BrainHealth, Max = authoring.BrainHealth });
        AddBuffer<BrainDamageBufferElement>();
    }
}
Now we do this:
public class BrainBaker : Baker<BrainMono>
{
    public override void Bake(BrainMono authoring)
    {
        var brainEntity = GetEntity(TransformUsageFlags.Dynamic);
        AddComponent<BrainTag>(brainEntity);
        AddComponent(brainEntity, new BrainHealth { Value = authoring.BrainHealth, Max = authoring.BrainHealth });
        AddBuffer<BrainDamageBufferElement>(brainEntity);
    }
}
You’ll see that we can use GetEntity passing in the desired TransformUsageFlags we want to get a reference to the outputted entity – the brain entity in this case. Then we’ll just need to pass that in as the first parameter of all AddComponent or AddBuffer methods.
ZombieBaker is the same concept:
public class ZombieBaker : Baker<ZombieMono>
{
    public override void Bake(ZombieMono authoring)
    {
        var zombieEntity = GetEntity(TransformUsageFlags.Dynamic);

        AddComponent(zombieEntity, new ZombieRiseRate { Value = authoring.RiseRate });
        AddComponent(zombieEntity, new ZombieWalkProperties
        {
            WalkSpeed = authoring.WalkSpeed,
            WalkAmplitude = authoring.WalkAmplitude,
            WalkFrequency = authoring.WalkFrequency
        });
        AddComponent(zombieEntity, new ZombieEatProperties
        {
            EatDamagePerSecond = authoring.EatDamage,
            EatAmplitude = authoring.EatAmplitude,
            EatFrequency = authoring.EatFrequency
        });
        AddComponent<ZombieTimer>(zombieEntity);
        AddComponent<ZombieHeading>(zombieEntity);
        AddComponent<NewZombieTag>(zombieEntity);

    }
}
Where things get a little different is for the Graveyard and Tombstone Bakers. This is because not only do we need to define the TransformUsageFlags on itself, but we also need to do the same for the entity prefabs we are referencing.
Here is the TombstoneBaker, notice how now we just need to also pass in the TransformUsageFlags on the GetEntity calls when we are setting the value of the TombstoneRenderer:
public class TombstoneBaker : Baker<TombstoneMono>
{
    public override void Bake(TombstoneMono authoring)
    {
        var tombstoneEntity = GetEntity(TransformUsageFlags.Dynamic);
        AddComponent(tombstoneEntity, new TombstoneRenderer
        {
            Value = GetEntity(authoring.Renderer, TransformUsageFlags.Dynamic)
        });
    }
}
Then GraveyardBaker needs to be updated as such. Notice how now we just need to also pass in the TransformUsageFlags on the GetEntity calls when we are setting the Tombstone and Zombie Prefabs:
public class GraveyardBaker : Baker<GraveyardMono>
{
    public override void Bake(GraveyardMono authoring)
    {
        var graveyardEntity = GetEntity(TransformUsageFlags.Dynamic);

        AddComponent(graveyardEntity, new GraveyardProperties
        {
            FieldDimensions = authoring.FieldDimensions,
            NumberTombstonesToSpawn = authoring.NumberTombstonesToSpawn,
            TombstonePrefab = GetEntity(authoring.TombstonePrefab, TransformUsageFlags.Dynamic),
            ZombiePrefab = GetEntity(authoring.ZombiePrefab, TransformUsageFlags.Dynamic),
            ZombieSpawnRate = authoring.ZombieSpawnRate
        });
        AddComponent(graveyardEntity, new GraveyardRandom
        {
            Value = Random.CreateFromIndex(authoring.RandomSeed)
        });
        AddComponent<ZombieSpawnPoints>(graveyardEntity);
        AddComponent<ZombieSpawnTimer>(graveyardEntity);
    }
}
Change ZombieSpawnPoints from NativeArray to BlobAsset
At this point, everything should work as expected in the editor. However, when running a build of the application, it will immediately fail. Long story short, this is due to how I used a NativeArray inside the ZombieSpawnPoints data component. This was a new addition to Entities 1.0 that I wanted to showcase, but at the time I didn’t fully understand the limitations or potential downsides of this feature. The correct way to implement this feature is though a Blob Asset.
Blob (Binary Large OBject) Assets are basically just stores of immutable data. These data stores can be referenced through data components and are guaranteed to be thread safe as the data is read only. In this example we are going to create a BlobArray to store the list of points a zombie can spawn from, then when we want to spawn a zombie, we can get a random point in that array.
It does the exact same thing as the NativeArray implementation, however with the NativeArray there are some additional safety checks that throw all sorts of errors with how I used them for this tutorial. If you’d like to get some more information on what Blob Assets are and how to use them, here is an introduction video I did a while back. Most of the concepts and Blob Asset API hasn’t changed too much since then, but there may be some other things in Systems that are done in an older way.
Back to the Zombie Brains project…
First thing to do is update the underlying data component. Open ZombieSpawnPoints.cs and change it from this:
public struct ZombieSpawnPoints : IComponentData
{
    public NativeArray<float3> Value;
}
To this:
public struct ZombieSpawnPoints : IComponentData
{
    public BlobAssetReference<ZombieSpawnPointsBlob> Value;
}

public struct ZombieSpawnPointsBlob
{
    public BlobArray<float3> Value;
}
Notice how the ZombieSpawnPoints data component now has an underlying data type of BlobAssetReference (as you could imagine this is a reference to the actual blob asset). In this instance, the blob asset is of type ZombieSpawnPointsBlob.
Further you’ll see that ZombieSpawnPointsBlob is just a regular struct (not a data component) with an underlying data component of BlobArray<float3>. This means that our Blob Asset is going to be an array of float3‘s to keep track of the various spawn positions.
Next, head over to GraveyardAspect.cs to cleanup a few things in there.
No need to change the reference to the ZombieSpawnPoints component at the top as it is still a regular data component (although the underlying type has changed)
private readonly RefRW<ZombieSpawnPoints> _zombieSpawnPoints;We will however want to have a few helper methods to check to see if the blob asset has been initialized and if it is populated with spawn points.
public bool ZombieSpawnPointInitialized()
{
    return _zombieSpawnPoints.ValueRO.Value.IsCreated && ZombieSpawnPointCount > 0;
}

private int ZombieSpawnPointCount => _zombieSpawnPoints.ValueRO.Value.Value.Value.Length;
Here you see that we check to see if the blob asset is created and the array length is greater than 0. You can also see that accessing the underlying data can be a bit messy (4x Values in a row… LOL) so it is usually a good idea to have some helper methods to make things cleaner.
Finally, just update GetRandomZombieSpawnPoint() as such:
private float3 GetRandomZombieSpawnPoint()
{
    return GetZombieSpawnPoint(_graveyardRandom.ValueRW.Value.NextInt(ZombieSpawnPointCount));
}

private float3 GetZombieSpawnPoint(int i) => _zombieSpawnPoints.ValueRO.Value.Value.Value[i];
Next, go to SpawnTombstoneSystem.cs
Remove that temporary spawnPoints NativeList as we won’t be using it.
Then create your blob builder and allocate memory for it (again I’ll point you to my blob assets video for some more information on what all this means)
var builder = new BlobBuilder(Allocator.Temp);
ref var spawnPoints = ref builder.ConstructRoot<ZombieSpawnPointsBlob>();
var arrayBuilder = builder.Allocate(ref spawnPoints.Value, graveyard.NumberTombstonesToSpawn);
Then inside the for loop, add the points to the arrayBuilder:
for (var i = 0; i < graveyard.NumberTombstonesToSpawn; i++)
{
    // Irrelevant code hidden //

    var newZombieSpawnPoint = newTombstoneTransform.Position + tombstoneOffset;
    arrayBuilder[i] = newZombieSpawnPoint;
}
Finally, outside the loop, create your blob asset reference, set it on the data component that belongs to the graveyard entity, then dispose the blob builder:
var blobAsset = builder.CreateBlobAssetReference<ZombieSpawnPointsBlob>(Allocator.Persistent);
ecb.SetComponent(graveyardEntity, new ZombieSpawnPoints{Value = blobAsset});
builder.Dispose();
Then the last thing you need to fix will be in the SpawnZombieSystem.cs
Just change this line:
if(graveyard.ZombieSpawnPoints.Length == 0) return;To this:
if(!graveyard.ZombieSpawnPointInitialized()) return;We have to do this because it will throw an error if we check the length of a null array that has not yet been created.
Creating a Build & Troubleshooting
Woo! Now it is time to finally create a build of your application. Creating a build is really the best way to gather performance metrics on your game as there is no overhead from the Unity Editor. Performance in build is often significantly better than in the editor.
Before running a build, there are a few things you can do to ensure the build is successful:
- Close the Graveyard SubScene – do this by un-checking the check box next to the SubScene in the scene hierarchy. When you run the game in the editor in this way, it will first load in the SubScene the same way it would in a build. Often times you may see errors when you test it in this way that you will need to resolve or your build will fail to run.
- A common one to see is when a system tries to find a singleton component or entity in the OnCreate() or OnUpdate() method of a system. Reason being is that during that first frame the game runs, the SubScene hasn’t been loaded so that singleton may not exist yet.
- The solution is to add the appropriate RequireForUpdate<T> line in the OnCreate() method.
- If you want to get a singleton one at the start and not every single frame, do this in the OnStartRunning() method as that won’t get called until the singleton exists if the RequireForUpdate() method is setup correctly.
- Resolve Loading Entity Scene Failed errors – this seems to be a bug with Unity. What typically works for me is restarting the Unity Editor, then clearing the Entity Cache. To do this open the Preferences window (Edit > Preferences) then in the Entities section, click Clear Entity Cache and try again.
- Save your scene and SubScene – without doing this, your build will fail immediately.
Then do create a build, just open the standard build window (Ctrl + Shift + B) and add the main scene to the build config list (no need to include the SubScene in the list). Then just run a build of the game as you normally would!
Conclusion
Thanks for following along with this tutorial and supplementary information. I certainly hope this was helpful to you on your journey to experiment with Unity’s Data Oriented Technology Stack and their Entity Component System. If you do have any further questions, feel free to ask them in the comment section of the tutorial video, or join our awesome community over on Discord.
All the best!
-Johnny Turbo
Recent Comments