
Nearly two years ago I posted my first Unity DOTS/ECS tutorial onto the Turbo Makes Games YouTube channel. This tutorial was a recreation of the classic Unity Roll-A-Ball tutorial using Unity’s Data-Oriented Technology Stack and their Entity Component system.
Though many of the main concepts hold up two years later, a lot has changed in Unity ECS since then… The tutorial was originally created on Entities version 0.5 and the current version in early 2022 is 0.17.
I do intend on creating a full update of this tutorial to show all the changes and best practices; however, I want to do it after the release of Entities 0.50, which is scheduled for release in Q1 2022. As such, I want to create this blog post as a way to bridge the gap between how things were done to years ago and how they are done now.
If you haven’t seen the original Roll-A-Ball tutorial, you can watch it right here:
You can download the updated Unity project files below.
Project and Package versions
For starters, you should know that Unity ECS only officially compatible with Unity version 2020.3 LTS. Watch this video for more information on that.
Also, the way you install experimental DOTS packages is different. In short, you’ll open the package manager, click the “+” icon in the upper left, then click “Add Package from Git URL…” then add the following packages:
com.unity.rendering.hybridcom.unity.physics
Doing that will give you the latest version of the hybrid renderer and the DOTS physics packages. The Entities package and other required packages are dependencies of these, so by adding these two, everything else will be included.
Watch this video to show you how to add packages in this manner as well as through another method:
Alternatively, you can watch this video that gives you a full overview on how to setup a new DOTS project in Unity.
Components
All the data components (structs implementing IComponentData) that we wrote in the original Roll-A-Ball tutorial need no modification as these are still setup the exact same.
The only thing I might do differently now, is name the underlying variables of these data components as “Value” so that when we access them we just say DataType.Value i.e.
using Unity.Entities;
[GenerateAuthoringComponent]
public struct SpeedData : IComponentData
{
public float Value;
}
public class SomeClass
{
var speedData = new SpeedData();
speedData.Value = 5f;
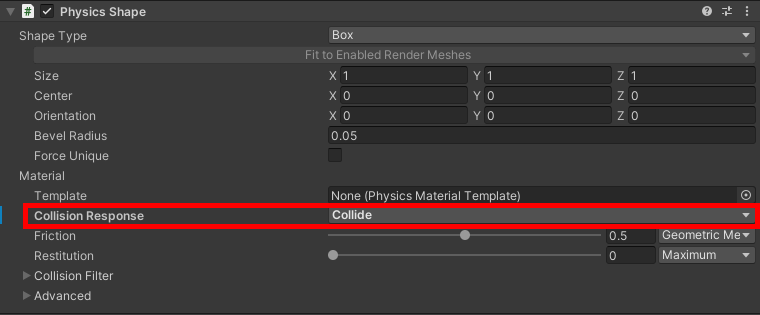
}Inside the Unity Editor, the authoring components for the DOTS physics components changed slightly. Now to set it is a trigger, you’ll just need to set the Collision Response property to “Raise Trigger Events” for the cubes initially spawned in the world and set it to “Collide” for the cubes you’ll spawn for the “insane mode” effect at the end.
Systems
This is where most of the changes to the project are made.
For starters, all systems should inherit from SystemBase, not JobComponentSystem! SystemBase is the new standard moving forward and it has a number of really convenient changes.
The first being the automatic Dependency property.
You’ll notice that when you update your systems to inherit from SystemBase, the OnUpdate() method gives you all kinds of errors. This is because this method no longer takes in dependencies from the inputDeps variable, they are automatically added to the Dependency property of the system.
As such, you’ll need to change the OnUpdate() function signature to:
protected override void OnUpdate()The other notable change is that SystemBase no longer requires the [AlwaysSynchronizeSystem] attribute, so that can safely be removed from all systems.
For those, newer to Unity DOTS and ECS, I’d recommend checking out this video that introduces the concepts of using Systems in Unity ECS.
For more information on the automatic Dependency property, check out the video below. Though I will warn you that if you aren’t pretty familiar with how things work in Unity ECS some of this might be a bit confusing.
Movement and Rotation Systems
These systems don’t require any major breaking changes. Just do the following:
- Remove the
[AlwaysSynchronizeSystem]attribute - Update the
OnUpdate()method signature - Delete the
return default;line at the end of theOnUpdate()method
Here is the full Movement System:
using Unity.Entities;
using Unity.Physics;
using Unity.Mathematics;
using UnityEngine;

public class MovementSystem : SystemBase
{
    protected override void OnUpdate()
    {
        float deltaTime = Time.DeltaTime;

        float2 curInput = new float2(Input.GetAxis("Horizontal"), Input.GetAxis("Vertical"));

        Entities.ForEach((ref PhysicsVelocity vel, in SpeedData speedData) =>
        {
            float2 newVel = vel.Linear.xz;

            newVel += curInput * speedData.speed * deltaTime;

            vel.Linear.xz = newVel;
        }).Run();
    }
}
And here’s the full Rotation System:
using Unity.Entities;
using Unity.Transforms;
using Unity.Mathematics;

public class RotationSystem : SystemBase
{
    protected override void OnUpdate()
    {
        float deltaTime = Time.DeltaTime;

        Entities.ForEach((ref Rotation rotation, in RotationSpeedData rotationSpeed) =>
        {
            rotation.Value = math.mul(rotation.Value, quaternion.RotateX(math.radians(rotationSpeed.speed * deltaTime)));
            rotation.Value = math.mul(rotation.Value, quaternion.RotateY(math.radians(rotationSpeed.speed * deltaTime)));
            rotation.Value = math.mul(rotation.Value, quaternion.RotateZ(math.radians(rotationSpeed.speed * deltaTime)));
        }).Run();
    }
}
Pickup System
The Pickup System requires the most changes. For starters, update it to inherit from SystemBase then add the attribute: [UpdateInGroup(typeof(FixedStepSimulationSystemGroup))]
That attribute will force the system to update on a fixed timestep, which is preferred for physics interactions, like we are doing here.
As such, go ahead and update the entity command buffer system to use the type of EndFixedStepSimulationEntityCommandBufferSystem – which will execute the queued operations at the end of the fixed physics timestep.
So the first part of the script will look like this:
using Unity.Entities;
using Unity.Collections;
using Unity.Physics;
using Unity.Physics.Systems;

[UpdateInGroup(typeof(FixedStepSimulationSystemGroup))]
public class PickupSystem : SystemBase
{
    private EndFixedStepSimulationEntityCommandBufferSystem bufferSystem;
    private BuildPhysicsWorld buildPhysicsWorld;
    private StepPhysicsWorld stepPhysicsWorld;

    protected override void OnCreate()
    {
        bufferSystem = World.GetOrCreateSystem<EndFixedStepSimulationEntityCommandBufferSystem>();
        buildPhysicsWorld = World.GetOrCreateSystem<BuildPhysicsWorld>();
        stepPhysicsWorld = World.GetOrCreateSystem<StepPhysicsWorld>();
    }

/*
 *
 *
 *
 */

}
For more information on the details of Entity Command Buffers (very important concept in Unity ECS) watch the below video:
Moving on, be sure to update the method signature of OnUpdate() here as well.
Then update the inputDeps to use the built-in Dependency property. Also, you don’t have to define the new TriggerJob and schedule it in two different steps. So, OnUpdate() should now look like:
protected override void OnUpdate()
{
    Dependency = new TriggerJob
    {
        speedEntities = GetComponentDataFromEntity<SpeedData>(),
        entitiesToDelete = GetComponentDataFromEntity<DeleteTag>(),
        commandBuffer = bufferSystem.CreateCommandBuffer(),
    }.Schedule(stepPhysicsWorld.Simulation, ref buildPhysicsWorld.PhysicsWorld, Dependency);
    bufferSystem.AddJobHandleForProducer(Dependency);
}
Finally, there are a few minor changes that need to be made in the TriggerJob
To access the entities involved in the trigger event, you no longer need to access the Entities property on the TriggerEvent to get to each entity involved in the event. Just do triggerEvent.EntityA and triggerEvent.EntityB.
Then I now add the DeleteTag to the cube entity in a slightly different way.
Finally, I remove the queue the removal of the PhysicsCollider from the cube entity. This is kindof a hacky solution, but it is basically so that only one trigger event gets raised.
And here is the end result of the TriggerJob:
private struct TriggerJob : ITriggerEventsJob
{
    public ComponentDataFromEntity<SpeedData> speedEntities;
    [ReadOnly] public ComponentDataFromEntity<DeleteTag> entitiesToDelete;
    public EntityCommandBuffer commandBuffer;

    public void Execute(TriggerEvent triggerEvent)
    {
        TestEntityTrigger(triggerEvent.EntityA, triggerEvent.EntityB);
        TestEntityTrigger(triggerEvent.EntityB, triggerEvent.EntityA);
    }

    private void TestEntityTrigger(Entity entity1, Entity entity2)
    {
        if (speedEntities.HasComponent(entity1))
        {
            if (entitiesToDelete.HasComponent(entity2)){ return; }
            commandBuffer.AddComponent<DeleteTag>(entity2);
            commandBuffer.RemoveComponent<PhysicsCollider>(entity2);
        }
    }
}
Delete Entity System
For the Delete Entity System, you’ll do much the same as previous system conversions
- Remove the
[AlwaysSynchronizeSystem]attribute - Add the
[UpdateInGroup(typeof(FixedStepSimulationSystemGroup))]attribute - Use an End Fixed Step Simulation Entity Command Buffer, rather than using your own
In the end, the Delete Entity System will look like this:
using Unity.Entities;

[UpdateInGroup(typeof(FixedStepSimulationSystemGroup))]
[UpdateAfter(typeof(PickupSystem))]
public class DeleteEntitySystem : SystemBase
{
    private EndFixedStepSimulationEntityCommandBufferSystem _endSimulationECBSystem;

    protected override void OnStartRunning()
    {
        _endSimulationECBSystem = World.GetOrCreateSystem<EndFixedStepSimulationEntityCommandBufferSystem>();
    }

    protected override void OnUpdate()
    {
        var ecb = _endSimulationECBSystem.CreateCommandBuffer();

        Entities
            .WithAll<DeleteTag>()
            .WithoutBurst()
            .ForEach((Entity entity) =>
            {
                GameManager.instance.IncreaseScore();
                ecb.DestroyEntity(entity);
            }).Run();
        _endSimulationECBSystem.AddJobHandleForProducer(Dependency);
    }
}
MonoBehaviours
Both MonoBehaviour scripts (GameManager.cs and CameraFollow.cs) need no modifications to work with the above changes.
Though I did just want to mention there are a few things I’d do differently now and will be updated in the next version of the DOTS Roll-A-Ball tutorial.
Notably, check out this video for how to make a better camera follow system that uses either the standard Unity camera or Cinemachine.
Conclusion
Hope this post helped you update your project to latest standards of Unity ECS. Again, I do plan on creating a full updated video of this tutorial once Entities version 0.50 is out in the wild. But let me know if you had any issues with the above and if you still have any questions.
Recent Comments